
Research
and Compliance Mode note:
In RUO mode, all users can perform these tasks.
In Compliance mode, only ModFitAdmins
have permission to perform them.
Use this command to review, edit, and create cutoff ranges for different tissue types. The cutoff ranges you enter are used by the Fit Diagnostics routine to assign S-Phase percentages into low, intermediate, or high classifications.
Refer to the DNA Consensus Conference report (Cytometry 14, p471-500, 1993 (c) Wiley-Liss, Inc.) for information on establishing cutoffs in your laboratory.
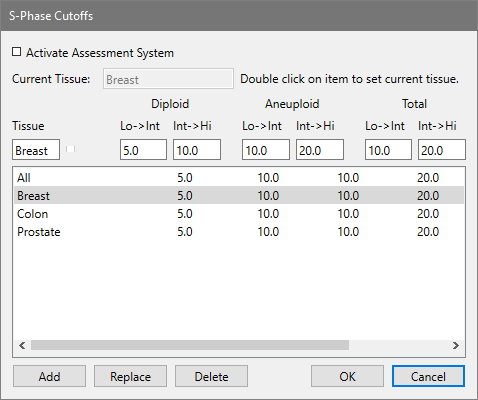
To enable the S-Phase assessment system, check the Activate Assessment System checkbox.
To disable the S-Phase assessment system, clear the check from the Activate Assessment System checkbox.
To add a tissue cutoff, enter a tissue type in the Tissue edit box. Then enter the thresholds for low-to-intermediate and intermediate-to-high for each ploidy type. Click the Add button to add the new type to the list of choices.
To set a tissue type as the Current Tissue, double click the entry in the listbox. The current tissue is displayed at the top of the dialog and on the Toolbar in the Tissue type drop-down listbox.
To edit a tissue cutoff, click the listbox entry for the tissue you want to edit. Make changes to the ranges in the edit boxes, and then click Replace to update the entry.
To delete a tissue cutoff, click the listbox entry you want to delete. Then click the Delete button.
To accept changes to the dialog, click OK.
To discard changes to the dialog, click Cancel.